Short Rows
Rows are not always worked from end to end. They can
be stopped at any point and then turned and worked
backwards. They have many uses (see below) but a
drawback can be that turning the row will leave a hole.
For some patterns, this is an asset but for many it's
not. If it's important not to leave a hole in your
pattern, for example with socks, see How to Avoid Holes.
| Short Row Uses | |
|---|---|
| Use | Description |
| Curves | Used in decorative knitting or in garments such as skirts or collars |
| Horizontal Darts | Used to lengthen one side of the fabric by using shorter or longer rows in each consecutive row |
| Medallions | Used in decorative knitting or bolsters to make geometric shapes such as spheres and cylinders |
| Mitered Corners | Used to work perpendicular joints for hems, casings, edgings, etc. |
| Row Adjustments | Used to avoid pulling when working blocks that don't have the same row depth |
| Sculptured Knitting | Used to create three-dimensional patterns using double darts |
| Ruffles | Used to create an edging at one end of the fabric that is created like vertical gathers |
| Special Effects | Combining multiple short row techniques to create stunning three-dimentional effects |
| Vertical Gathers | Used to gather an insertion |
How to Avoid Holes
To avoid creating a hole when working a short row,
using one of the three methods below. The instructions
are all for Stockinette stitch, if you use a different
stitch pattern, you may need to make adaptions.
Advantages of each:
| Tie (Wrap) | Easiest |
| Over | Loosest |
| Catch | Neatest |
The Tie method is the easiest of the three and it creates a neat diagonal. The first method slips the yarn around the the stitch. If this tie interferes with the pattern, use the second method which is a two step process on the loom that setups of the tie during the short row to be picked up in the first long row. The second method is the most common method used in advanced sock patterns on looms that are not adjustable.
Method 1
- Before turning the work, pick up the next
wrap (to left working odd rows, right working
even rows) with your knitting tool.
- Bring the working yarn between the back of
the peg and the front of the held wrap.
- Place the wrap back on the peg.
- Bring the working yarn around the back of
the peg.
The wrap is now "tied."
- Turn the row.
The first stitch of the row is the next stitch after the tie. It is usually worked by slipping it knitwise (wyib).
Method 2
- Before turning the work, pick up the next
wrap (to left working odd rows, right working
even rows) with your knitting tool.
- Bring the working yarn around the empty
peg, front to back.
- Place the wrap back on the peg.
This creates a "tie" that can easily be picked up!
- Turn the row.
The first stitch in the row is the next stitch after the tie. It is usually worked by slipping it knitwise (wyib) and then knitting the rest of the row.
- The first long row the comes to the peg with both wraps, knit both wraps off together.
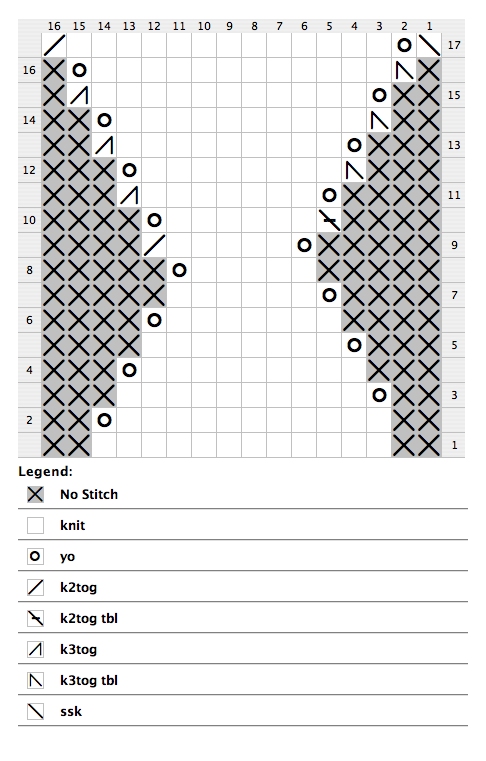
The Over method is the loosest of the three. Yarn overs are worked on both sides of the fabric and the wraps are picked up in the long rows. The chart below is an example of what an Over heel and gusset would look like. The chart is created for the knit stitch. If you prefer to the knit tbl stitch, remember to switch the k2tog and k2tog tbl as well as the k3tog and k3tog tbl stitches.
Short Rows
- Before turning the work in the second short
row, setup the row by working a YO at the end
of the row. The wrap is placed on the peg that
is opposite of the direction you are working.
The peg prior to the first peg in the row will have two wraps on it.
- Knit off row and turn.
- Setup the next short row so that the wrap
from YO is placed on the peg that is opposite
of the direction you are working.
The peg after to the last peg in the row will have two wraps on it.
- Knit off row and turn.
- Continue steps 1-4 following the pattern
directions.
Some pegs will end up with 3 wraps on them after the wraps have been moved into place.
Long Rows
Continue as above. As you knit off the rows, you will pick up the the multiple wraps and k2tog or k3tog in odd rows and k2tog tbl or k3tog tbl in even rows. This is reversed if your main stitch is k tbl.
The Catch method is the neatest method of the three. The first method is the most commonly used catch method. It "catches" the second bar that runs between stitches to work a K2tog or SSK stitch. The stitch leans into the short row. The second method is similar to the first except it "catches" with the loop at the base of the next stitch and leans away from the short row.
Method 1
For odd rows, you will work a k2tog with the "catch" of the bar and the current stitch; for even rows, you will work an ssk with the "catch" of the bar and the current stitch.
- Turn your work.
- Slip the first stitch knitwise (wyib) and
work a short row.
- On the first long row, with your fingers,
pick up and hold the stitch two stitches beyond
the last one worked.
This will be two to the left for odd rows (working the row from right to left) and two to the right for even rows (working the row from left to right).
- Locate the bar that runs between the next
stitch to be worked and the stitch in your
hand.
- Pick up the second bar and place it on top
of the next stitch to be worked.
There are now two wraps on the next peg to be worked.
- Place the wrap in your hand back on the
empty peg.
- Knit both wraps together.
Method 2
For odd rows (working from the right to the left), an SSK is worked; for even rows, a K2tog is worked.
- Turn your work.
- Slip the first stitch knitwise (wyib) and
work a short row.
- On the first long row, with your fingers,
pick up and hold the stitch next to the last
one worked (to the left in odd rows and right
in even rows).
- Pick up the loop below the wrap on the next
peg and place it on the empty peg.
- Place the wrap in your fingers back on the
peg.
There are now two wraps on the next peg to be worked.
- Knit both wraps together.