Decreasing Stitches
Decreasing reduces the number of stitches on a row. It is used to shape the knitted fabric. They are generally are worked in the odd rows (RS for needle knitters) and slant either right or left. Left slanting decreases are worked on the right side of the bottom rake (towards the last peg) and the left side of the top rake (towards peg 1). Right slanting decreases are worked on the left side of the bottom rake (towards peg 1) and the right side of the top rake (towards the last peg). For those of you who also do round loom & rake knitting, remember that the numbering order of the pegs is the opposite.When working decreases on the knitting board, you need to work them in pairs. Each side of the fabric will slant in a different way so if you decrease on the left bottom rake with a K2tog, you'll need to decrease on the top left rake with an SSK. Most knitting board knitters use an SKP but the preferred stitch is actually an SSK because it is less sloppy.
Where you decrease depends on what your end goal is. If you don't want your decrease to show, you should place it on the edge of the knitted fabric but make sure that you slant it correctly. However, if you want to make it easier to pick up or join stitches, you should work the decrease one stitch from the edge.
Stitches that are being decreased can hang in different orders. For example, the first stitch could be on top of the second stitch or vice versa, leaning to the left or the right. The order of stitches is important, both for appearance and for the way it pulls the fabric.
Information on how to evenly space decreases and increases is coming soon. The math behind how to change the wrapping pattern will be explained.
Binding Off
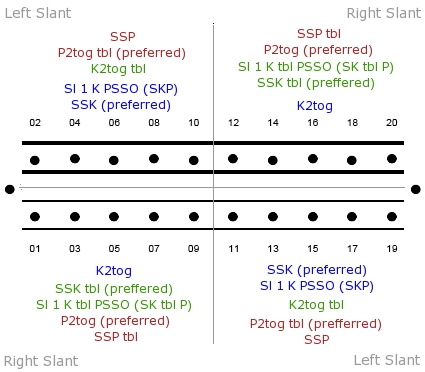
A series of adjacent decreases is essentially binding off. After all, a simple form of binding off is consecutive K2tog, P2tog, K2tog tbl, or P2tog tbl.The diagram below shows the placement of decrease stitches on the knitting board. Stiches are paired by color to help you determine where to place each decrease. Click on the diagram to see a larger image.
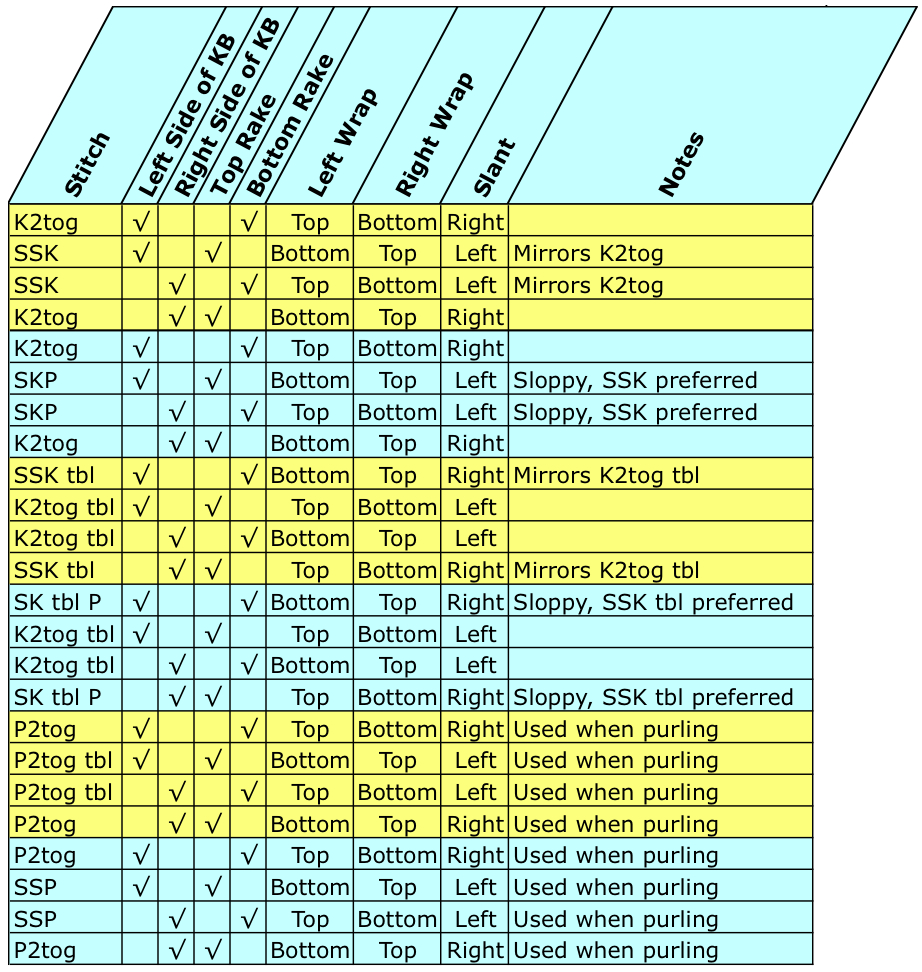
The chart below details the position of the decrease stitch on the board and which stitch is on top (moving across the board from left to right). They are grouped in four, one decrease for each side of the knitting board and each rake. It is suggested that you use the groupings in yellow for the most even results. Remember to setup the board first before wrapping the stitch pattern and knitting off. Click on the chart to see a larger image.